Wednesday, October 29, 2014

Victorian Winter Dress: First Steps

So, a lot happened in anticipation for sewing this dress. I made the Victorian Undergarments, bought a new sewing machine and a ruffler foot. I've got to say that after the first day of sewing on the skirt I'm happy with the equipment I bought.

The machine works well with the thick velvet and effortlessly switches between the thick (pleated) fabric and the silk trims.
I've used my Serger (Lock machine) for underlining the skirt and finishing other raw edges, since the dupion silk frays when handling it.

The ruffler foot works wonders for the trims I'm making. I did break like 2 needles and made some test pleats before I got the hang of it.

Although I can't show you pictures of the front piece I've sewn today, since it won't hang right yet, I've made a picture to show you the fabrics I'll be using.

On the left is the main fabric. I'm not sure it's velvet, but it's more a suede kind of fabric. Really soft and beautiful and on the right the Dupion silk which is pleated with the ruffler foot.

Wednesday, October 15, 2014

Victorian Undergarments: Some hustle with a bustle!

So.... after making the basic bustle in about a days work (without counting the cutting of the fabric and tracing of the pattern) it took me a little longer to make the ruffled overlay. It is optional, but since I like poofiness I added it. Boy did I regret that at some times. 
Even when gathering by using my machine it was a lot of work. The gathering wasn't even the worse. It was the hemming of the ruffles! When I got my own ironing board it helped a lot since I didn't have to move the fabric that much. 

The pattern that I used: Truly Victorian TV TV101(found here) was again really clear in it's instructions. Although I had to figure out how much ruffles where needed on the overlay by myself. The instructions aren't clear about that. You need to cut the pieces 9 times and they have to go in 6 different layers, but there isn't a recommended way described.

On with the pictures: 


 Do you see the poofiness! It's awesome!


Thursday, October 2, 2014

Victorian Undergarments: Corset finished


Although the corset didn't turn out perfect I did learn a lot I can use for the future.
The Truly Victorian pattern is really easy to understand and with some additional tips I've gotten through the years it worked well enough.

I did make the boning channels a little too tight at some points, since I didn't use boning tape as a guide. However with a little help I could get the boning through without trouble.

I do know that I'll need to have a machine with a zipper foot next time, since I did have to leave some more room between the edge and the boning, since my machine wouldn't work well to sew directly to the bones.

But onto the pictures!

As you can see the bias isn't exactly even, but I don't care.

The backside. Not fully laced on the mannequin, but enough to get the shape.
 A close up for the fabric. It has a nice pattern, but it was difficult to capture on picture.

 A boob shut to see the bias and again you can see the pattern on the fabric.


Tuesday, September 23, 2014

Victorian Undergarments: Surprise corset!


So after sewing the chemise and drawers I wanted to start on a bustle to go under my petticoats.
So I grabbed a bought victorianish corset I had and dressed myself in the chemise, drawers and corset. However I quickly found out why I haven't worn that corset that much. It's too high and big and gives me the dreaded Corset Ridge.

So since I already had the pattern and fabric for a corset, since I tended to do one later. I decided that it was necessary to make a corset. I can't go out with a beautiful bustle dress with a badly fitting corset now, could I?

 So after tracing and alterating the pattern, following the clear instructions by Truly Victorian, I made a fitting corset of canvas. The pattern is wonderful as it also gives a way to fit a mock corset without having to bone and lace it. I had to alter a small thing, which was easily done.

Tonight I intended to simply sew in the busk and do the rest later. A couple of hours later I have a near complete corset where I just have to sew the boning channels, add the bones and finish with bias.

I made pictures, but somehow they aren't recognized. I will update this post later with pictures.

Also check my Facebook Page for short updates through the projects: https://www.facebook.com/chaosroyalcreations

Edit for pictures:


Wednesday, September 17, 2014

Victorian Undergarments: Drawers complete


So after finishing the chemise I started on the matching drawers.

The pattern I used, Truly Victorian TV102, is really clear. The drawers are a little more complex than the chemise and have therefore more instructions, but these are clear.

So after a few days work I was ready to attach the waistband only to found out I had 2 left legs in the literal sense. So after a little seamripping I quickly made the right leg... pun intended.

For both the chemise and the drawers I used cotton with cotton trim.

The front is partly closed. Only the first 10 inches or so are sewn together. The rest is open for an easy access to your bum. 

 The back side. You can see that the backside is open and tied with the ribbon. For the picture I pushed the parts a little away to show the open, but it quickly falls closed again. I doubt you'll see my butt if I would only wear the undergarments. 

Detail of the legband and trim. I debated early on if I wanted to make the leg band of lace or some embroidered cotton. However since probally nobody is going to see it and I do have a deadline I didn't do that. Perhaps one day I'll make some fancy drawers with embroidery and frills. 

Saturday, September 6, 2014

Victorian Undergarments: Chemise finished


So I bought fabric and trim on wednesday. My brother bought some lace and ribbon yesterday and I finished the chemise yesterday evening. I'm really happy with it. 

The pattern is really simple and has very clear instructions. Of course it's a simple garment. It's not lined but just a plain garment. 

I haven't hemmed it yet, since I might want to use the trim I used on the slim, but I will also need that trim for the drawers and I'm not sure if I have enough. 

The chemise is white cotton, with white trim and insertion lace. Currently it has a white ribbon in the insertion lace, but I intend to match the ribbon with the corset I'll wear. 


Detail shot of the sleeve. The insertion lace is kind of basic, but it's the only one they had at the store. It kind of suits a chemise.


Monday, August 18, 2014

Victorian Undergarments: Beginnings

Since the gamura isn't meant for a specific event (and most likely won't be worn before next year) that project is on hold. In the meantime I'm starting a new project.

Victorian Undergarments

I love Victorian dresses. Mostly bustle dresses. They have something sophisticated and also sexy. Also they are very versatile. A different bodice, overskirt or underskirt makes for very different combinations.
Since I expect I'll be making more Victorian Bustledresses I want to make a complete undergarment set.

This will consist of the following:

Chemise and drawers

Truly Victorian - TV102
 I will make these in some fine nice linen.

Corset

1880 Late Victorian Corset
A linen corset. I don't know what I'll use for the fashion fabric. 

Corset cover

Truly Victorian TVE02 Edwardian Underwear

Again linen or cotton with lace. 

Bustle

Truly Victorian - TV101
I made one before, but want to make a new one since the other one has some flaws. 

Petticoats

Victorian Petticoats

Since the bustle is within the petticoat separate petticoats aren't necessary. However it will give some extra volume. I like big butts I cannot lie. 

Monday, July 7, 2014

Gamurra: First steps

So after making a third bodice mock-up that I was happy with I got my fabric last week. After washing, drying and ironing my silk I bought new fabric scissors last Saturday. Not just scissors, but also golden trim, gold metallic thread for said trim and decorative stitches and thread for the turquoise fabric.

What started out as just cutting the pieces ended up in a nearly finished bodice. Still needs to be trimmed and properly ironed at this point. Also need eyelets for the lacing in the back, but that will be after the trim has been added.

The photo doesn't do the colour justice. It's blue, but sometimes green and I love how it looks with the golden color. The trim is slightly more golden yellow, so that adds some depth to the garment. I still want to make some small alterations to the bodice, mostly in the back so the fit is even better and it's easier to dress. 

The skirt pieces are also sewn together and I finished the seams. I want to do big boxpleats with more trims in the middle of the pleats. I'm debating where I will put the skirt. Right now the bodice is for the skirt to start at the hip. I kinda want to lift it up a bit so it starts just below my breasts like it does on this picture: 

Will pleat the skirt on a band so I can see how it will look like by just pinning this band onto the bodice. 

Saturday, June 21, 2014

Gamurra: mock up done


I finished the square necked chemise and 2 different bodices.  They're all just mock-ups. For the right look and feel.

Picture time:

Finished chemise: 

Finished high bodice: 
After this bodice I tried it on and found out that my tailoring dummy is bigger than myself. I had to buy another one and adjust the next bodice for my own fit. Luckily this was easily done.

Finished low bodice: It's View VIII on the pattern. On the new dummy so it fits better.

I kinda like the look with the lower cleavage. But I think I'm going to alter the patterns to make a more half breasted look. So a third bodice will be made.


In other news! I also have a facebook group where I will update on a more regular basis. Also with smaller updates.

Sunday, June 15, 2014

Camicia: Mock-up sort of finished


So today I had some time to kill and decided to work on the camicia mock-up. It's almost finished. Just need to press the seams and hem the underside. Perhaps, because it is a mock-up meant for fitting beneath the gamurra I won't hem it. Nobody will see it. It will be our little secret.

But pictures:

The camicia without sleeves and facing. And my closet at the back! 

With sleeves but without facing:

And finished. You can see the facing shining through, but that's okay. It's meant as an undergarment. 
Details for fun: 


Friday, May 30, 2014

Camicia: First steps


So yesterday I traced the pattern for the camicia and cut the fabric. I used the Cheesecloth, since I will be making a prototype first. I also decided to make the quare necked chemise from the patterns, instead of the round necked. Perhaps I will still make the round necked, depending on how it will look under the dress.

I've sewn the fronts together and will continue later with the rest. When it's all together I might thrown it over my Dummy to make some pictures.

Saturday, May 24, 2014

Italian Renaisance Gown: Camicia fabric bought

Please let me know what you think. Suggestions and feedback is GREATLY appreciated. I am a learning seamstress so any tips are more than welcome.


 Camicia

 So today I went to the market for a quick fabric run. Hoping to find some fabric suitable for the Camicia. Luckily the stall I normally go to was there with plenty of sheer white fabrics (for curtains, but who cares). I debated getting a plain sheer white and a sheer white with some embroidered white hearts on it, but settled on the plain white fabric, since I'm not certain I want to have embroidering on the entire fabric.
It's a pretty light fabric and has the texture and sheerness I wanted. Organza has a lovely look, but is too shiny and more firm than the sleek fabric I have now.

I also bought an off white linen like fabric. He didn't have linen, but this fabric is slightly less thick. Since it was only an euro per metre I just bought a few metres. It will be a nice fabric for a prototype Camicia or the Gamurra.

Here's a picture. Linenish fabric on the left, sheer sleek fabric on the right.

Gamurra and Giornea fabric choices

I've ordered samples of Dupion Silk to see which colour I would be using for the dress itself.
 I can't really capture the colours well on my camera, so I used the shops tumbnail:

The Gamurra will be made of a Turqoise kind of colour.
 For contrast fabric on the Gamurra will be a golden colour.
The Giornea will be made of a contrasting red scarlet: Perhaps I'll also make an Emerald coloured Giornea, but that coloured didn't add contrast to the dress, but sort of blended in. It's a nice look, but 'safe'.


Please let me know what you think. Suggestions and feedback is GREATLY appreciated. I am a learning seamstress so any tips are more than welcome.


Monday, April 28, 2014

New project plans: Italian Renaissance Gown, inspired by the Borgia's

Please let me know what you think. Suggestions and feedback is GREATLY appreciated. I am a learning seamstress so any tips are more than welcome.

Photo from the Borgias.

I've watched The Borgias, a intrigue ridden show about the same named family. Although the story is awesome I fell in love with the costumes. Lavish, silky dresses with braided and jeweled hair. It's all quite lavish and gorgeous. It made me want to make a dress like that.

The Italian gown, or Gamurra doesn't have stays and hoops and is very versatile as it has sleeves tied to the bodice with ribbons. This allows a person to change the sleeves quite easily. It's not uncommon to see the same dress with different sleeves to give it a whole other feel. Therefore it's perfect for a beautiful, comfortable and versatile Shop-outfit for my Festival-Going-ways. An outfit that isn't as big as crinolines which I often wear on the first day so I can do some dancing and shopping. The Fairy Queen or Miss Hartigan dresses wear pretty, but hard to get into a small stand with it.

Since this has a different silhouette than my previous dresses I will need to make the undergarments as well.
So this is what I will make:
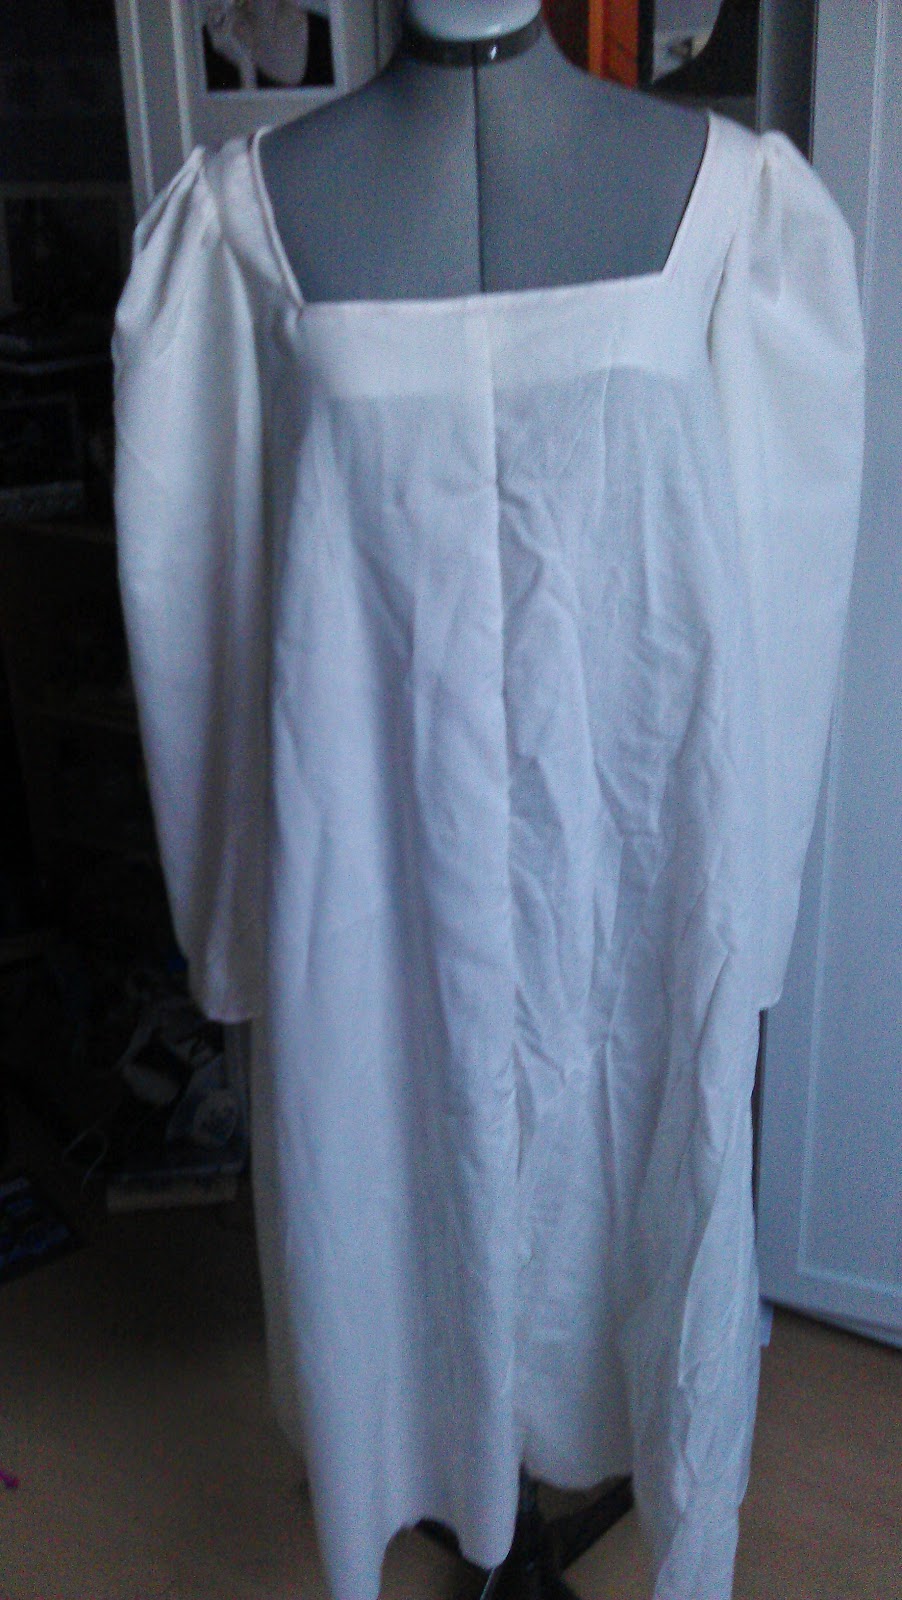
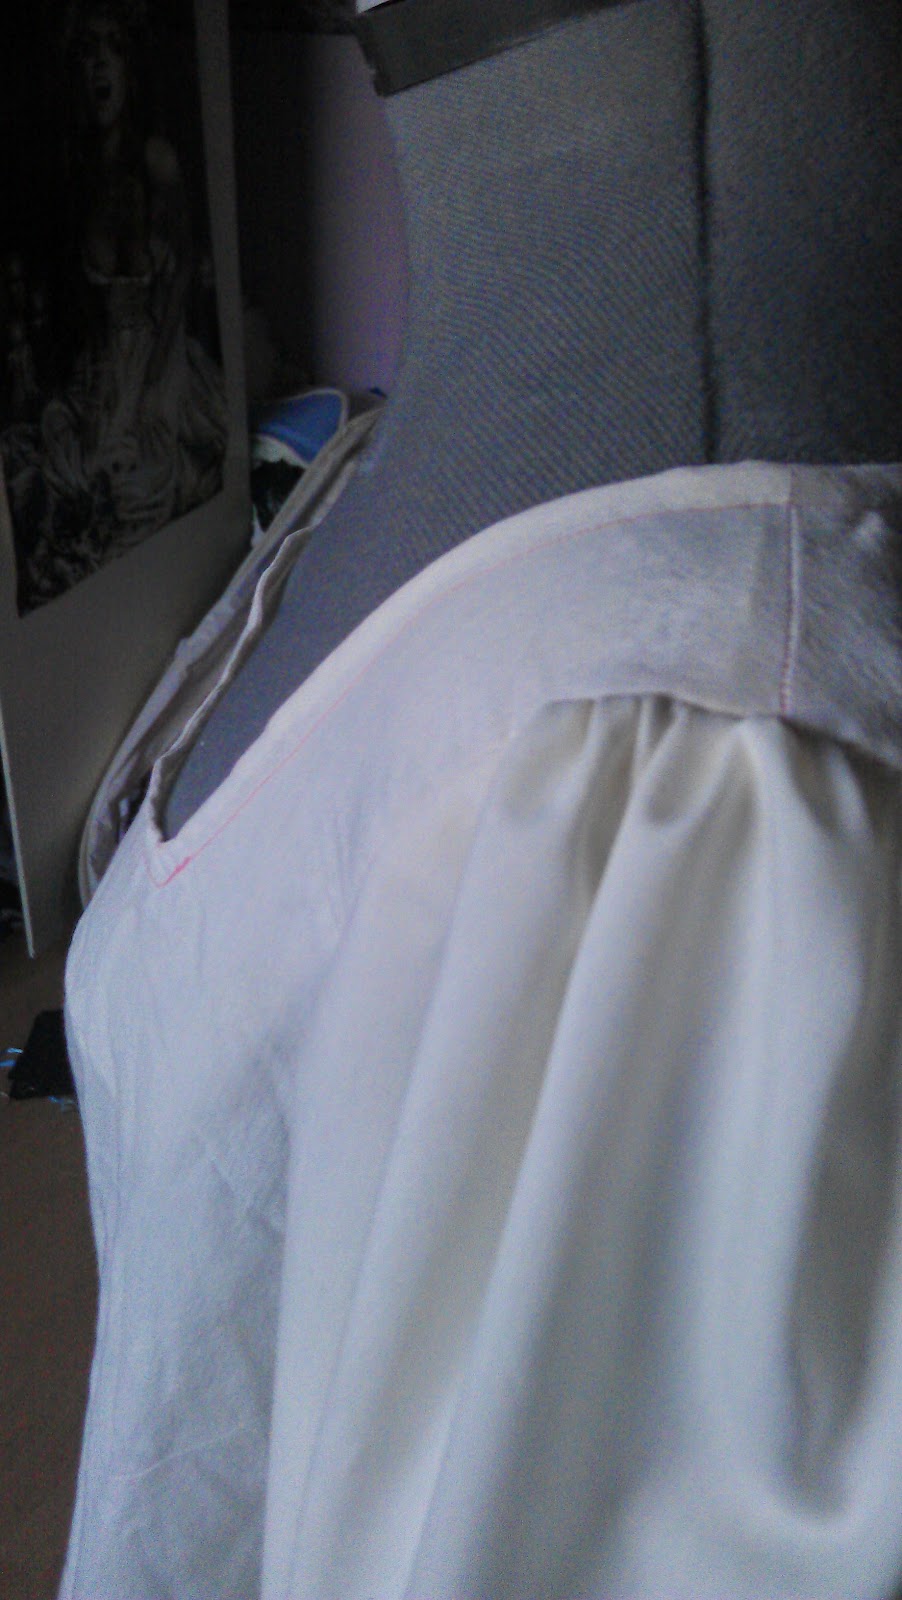
Camicia

The light colored under-dress is a sort of shift. It was worn as a layer between the skin and fine dress to absorb most of the body fluids. The Camicia is visible in this type or dress, showing between the sleeves and at the cleavage. 

I'm using pattern Period Patterns™ number 90. It has a wide array of different undergarments. I will be making the chemise of view 3. 

I'm intending to make it in a white slightly sheer fabric for aesthetic reasons, but will also be making a warmer version for colder days. It will be detailed with perhaps a few decorative stitching with gold. 

Gamurra

The dress itself is called the Gamurra. For this I will use Period Patterns™ number 41 I'm not sure about the sleeves I want for this. 
In contrast with previous dresses I mad this one will have lots of trims and ribbons. 

I will use dupion silk in blue/green and gold with golden trims and details. 

Giornea

This is a sleeveless overdress, often worn when going out. For this I will use the same pattern package as the Gamurra since this includes a Giornea. 

I will use dupion silk in either a contrasting Red or a more matching Emerald green. With both colors I will have golden trims and details. 

Please let me know what you think. Suggestions and feedback is GREATLY appreciated. I am a learning seamstress so any tips are more than welcome.


Wednesday, April 23, 2014

Fairy Queen: Finished!


So I finished the Fairy Queen dress just in time for the Elf Fantasy Fair.

So without further ado some pictures:
Picture by Zita Hisschemöller


The shoulders are a bit long so it didn't fall quite right around my bust.  Perhaps I will change this later.
Also the wings drooped, as you can see on this picture. I will also try to change this for the future. Perhaps even make new wings. I saw some beautiful wings in Elfia which really inspired me.

Monday, April 14, 2014

Fairy Queen: Oooh! Shinie!


Bodice

With the bodice together and the boning inserted it was time to add the Shinies to the bodice.
I've done this on Saturday for the better part of the day. It was more difficult than I thought. Luckily It worked and looks good. (Little bit of a dark picture, because I was losing the light)


All that's left to do on the bodice is adding the biastape/lining and the sleeves. I've wanted to make 2 different interchangeable sleeves for the bodice, but I don't know if I have enough time for that. I will try though.

Wings

Sunday I went to my best friends to make the wings. Unfortunately the decorating of the wings took longer than anticipated. We only had enough time to decorate the wings so they will still need to  be assembled. I will go there later this week to do this.


Accessories

I have the crown and hair and a necklace I can use. Nail polish is all settled. I'm still debating how I want to do my make-up and hoping I have time to test this before the event.
I have some glitter shoes, but I'm hoping to have some time left to go out and see if I can buy new ones. The ones I have are flat shoes and collect a lot of sand in the shoe. Not comfortable for this event.

Friday, April 11, 2014

Fairy Queen: Bodice making


I had already sewn the interlining to the fashion fabric. With only a week left 'till Elf Fantasy Fair time is running out.

Yesterday I moved my sewing machine upstairs so I can sew a few hours after work. I had been using the living room, but I need to vacate those premises when the parents return. With the limited time I have left I needed all the time I can get.

Yesterday I've seen the pieces of the bodices together. I have now 2 halfs of the bodice.

I give you a phone picture of my sewing desk and the 2 halfs of the bodice. Perhaps I can take a better picture tonight of the area. The lighting is bad, so the picture will be grainy.

Tuesday, April 8, 2014

Fairy Queen: Finished skirt!


Hi party people,

I finished the skirt for the Fairy Queen dress. I think it looks good. Here's a picture of the skirt with the crinoline underneath it.


Friday, March 28, 2014

Fairy Queen: Update


Unfortunately I didn't finish the skirt or the bodice. The skirt just needs to be pleated and sewn to the waistband, but my back hurts too much to do this today. Since I have Imagicon tomorrow I won't push my back to it's limit and pleating always takes a toll on my back.

But I promised pictures. Here's a picture of the dress with all the layers. It ended up being 4 layers after all, since the fifth wouldn't fit really well. Since the light was already fading the colours look less vibrant, but they are very vibrant.

Tuesday, March 25, 2014

Fairy Queen: Plans are made to be changed!


Monday I went to the market to buy more fabric. Unfortunately the stand wasn't there, yet I found some pretty other fabrics I could use. Lots of police and helicopters for the NSS. Luckily it wasn't a bother too much.

Yesterday I cut all the fabric. Found out I had did have enough of the pretty fabrics, just not the organza. Yesterday I didn't have enough energy to continue after cutting fabrics. My back ached as well.

This morning I started putting all my fabrics together. The new fabrics and the old fabrics and I made some decisions. I now had 6 fabrics, but only 4 were needed. So I decided to make 5 layers. Only the soft pink organza was cut, since it didn't really show on the fabric of the base skirt. It will have a much softer gradient and I think it will look prettier.

The rest of the day was spent sewing the layer parts together. Tomorrow I will hem and ruffle them. Before I'm sewing them onto the skirt I can always change things again. I'm flexible like that.

Unfortunately I didn't take any pictures today and I don't feel like doing it tonight as well. I will try to make some pictures tomorrow.

Thursday, March 20, 2014

Fairy Queen: Wig and crown!


So I received my wig and crowns this week. I ordered 2, because I couldn't decide.

The wig is a little less yellow than this picture suggests. This is the big crown. I like the bigness of it. But it doens't follow the shape of my head that much. I would also need to poof up the wig more than with the other crown. Yet I do feel this is more of a Fairy Queen crown than the other one. 

This crown follows the shape of my head very well and I love how sparkly it is. It's also shorter so I won't need to poof the wig that much. But I also fear that when I poof the wig and style it the crown gets lost in the curls and wig since it's more subtle. Even though I'm not sure if this crown is Fairy Queen material, I love the crown so much I will use it for other costumes. 


I have the same wig in a more brownish colour which is also very pretty. I have however cut the bangs on that wig so it fits perfectly without a crown. With a crown however the wig needs to move backwards and the bangs would be too short for that.

Next week I have another week of sewing planned, so I hope to finish the dress to an at least wearable and 'testable' state. I need to see this together to figure things out.

Monday, March 10, 2014

Fairy Queen: Market run, failed.


So today I went back to the Noordermarkt in Amsterdam to get more of the fabrics. I re-calculated how much I needed which is about twice as much. Since this market is only open on monday morning I moved my shift to a later shift, enabling me to go before work. 
So this morning I got out of bed early and left for Amsterdam on 8 o'clock. An hour later I arrived at the market. 

I bought canvas for my bodice and continued over the marketstreet towards the stand where I bought the other fabrics. Only to see an empty stall. A quick inquiry at the neigboring stand taught me that he probally wasn't going to come since he would have been there already. (Market was just open and many stalls were still setting up). Disappointing. So even though I checked the rest of the stalls I couldn't find the fabrics I wanted to use. Or something else I liked for a decent price. 

I did manage to get the magenta organza I needed. But I need to go back for the other fabrics. I'm kinda bummed, but at least I can finish the bodice. 

Wednesday, March 5, 2014

Fairy Queen: Recap


Since some people were wondering which patterns I used and stuff a little recap about my current project. No ramblings, just pictures.

My Fairy Queen costume will comprise of the following.

Crinoline finished:

Skirt: In progress. No pictures.

Bodice:
Skirt and Bodice colours:
(bodice- far right, Skirt- everything else)
Bodice shinies:
Wings: In progress

Alright. I hope you can use this collage to get a fair idea about the look i will get. Thanks for following my blog and I love comments, so please comment.

Maybe I'll use the pictures to photoshop something together. If I get enough comments asking for it :P *commentwhoring*

Sunday, March 2, 2014

Fairy Queen: I can fly


Yesterday I went to my best friends house to work on our wings. We have tried some techniques with old pantyhose.

We used electrical wire and panty hose. We couldn't find any white ones, so used pale flesh coloured ones. We bought Flamingo Pink en Powder Pink Dylon textile dye to see if we can colour the panty. Dylon says: No, but fashionblogs say Yes. Guess we are going to find out.

Without further ado the basic shape of my wings.

Also I have sewn the basic skirt together. But when cutting the ruffles I found out I haven't got enough fabric so I need to buy more. Unfortunately I bought the fabric at a market that's only there on a monday morning, so I need to change my shift at work to buy some more. Luckily for the organza I can go to the local store.

Monday, February 17, 2014

Fairy Queen: Fabric pictures


Finally I'm posting some long overdue fabric pictures. I have been busy with work and the light was gone everyday so I couldn't make decent pictures. Today I had an early shift so there was still sunlight left for a few pictures.

From left to right:
Light pink with silver lace (layer)
Light pink organza (layer)
Dark pink with silver lace (layer)
Magenta Organza (layer)
Darkish pink Cotton (base of skirt)
Magenta taffeta kind of (bodice)

Not pictured:
Light cotton (Mock up bodice)
Magenta lining
The Shinies!!!

I have already sewn the base skirt parts together, but still need to cut the waist side of the skirt in the right shape.